Showing posts with label Technical support. Show all posts

Friday, February 11, 2011

Scheduled Tasks


Scheduled task in Windows XP

With Scheduled Tasks, you can schedule any script, program, or document to run at a time that is most convenient for you. Scheduled Tasks starts every time that you start Windows XP and runs in the background, and it starts each task that you schedule at the time that you specify when you create the task.

Steps on How to schedule a Task in Windows XP
1.     Click on the Start button>Go to All Programs>Select Accessories>Double click on Scheduled Tasks.
                       
2.     A wizard will appear.  A list of programs that are installed on your computer, either as part of the Windows XP operating system, or as a result of software installation when you click on the Next button.
                             
3.     Use one of the following procedures:
a.     If the program that you want to run is listed, click the program, and then click Next.
b.     If you want to run a program, script, or document that is not listed, click Browse, click the folder and file that you want to schedule, and then click Open.

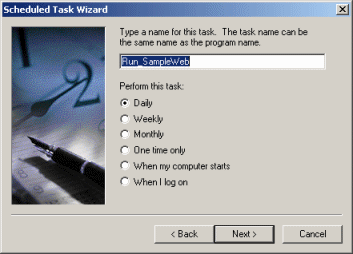
4.     Type a name for the task, and then choose one of the following options:
a.     Daily
b.     Weekly
c.      Monthly
d.     One time only
e.     When my computer starts (before a user logs on)
f.       When I log on (only after the current user logs on)

5.     Click Next, specify the information about the day and time to run the task, and then click Next.
                                 
6.     Type the name and password of the user who is associated with this task. Make sure that you choose a user with sufficient permissions to run the program. By default, the wizard selects the name of the user who is currently logged on.
7.     Click Next, and then click Finish after you verify the choices that you have made.

Wednesday, February 9, 2011

Turn On/Off Bit Locker- Windows 7


Bit Locker
Bit locker drive encryption allows a user to help protect data from hackers, loss or theft.

Available in Windows 7 and available in the Ultimate and Enterprise editions, Bit Locker helps keep everything from documents to passwords safer by encrypting the entire drive that Windows and your data reside on. Once Bit Locker is turned on, any file you save on that drive is encrypted automatically.


Saturday, February 5, 2011

Advanced Clean-Boot Troubleshooting


You can start your computer with minimal, basic drivers, which is also known as a "clean boot," to figure out if a program is causing a problem. Troubleshooting problems with background programs can be time-consuming, so performing a "clean boot" can save time and frustration.

SoC Tech for next version of Windows

Microsoft announced that the next version of Windows will support System on a Chip (SoC) architectures including ARM-based systems from partners NVIDIA, Qualcomm and Texas Instruments. Intel and AMD continue their work on low-power SoC designs on the x86 architecture that fully support Windows, including support for millions of x86 applications worldwide. SoC architectures will fuel significant innovation across the hardware spectrum when coupled with the depth and breadth of the Windows platform.

Thursday, February 3, 2011

Be Hastle Free, and Ensure Your Data Is Safe


Be Hastle Free, And Ensure Your Data Is Safe.

Encrypt a file or folder:When you encrypt a file or folder, you are converting it to a format that can't be read by other people. A file encryption key is added to files or folders that you choose to encrypt. This key is needed to read the file. Windows XP Professional makes the encryption and decryption process easy—simply follow the steps below to encrypt your files or folders. When you are logged on to your computer, you'll be able to read them. Anyone who tries to use your computer without your logon will not be able to read them.

Power Supply Fitting for a PC


For those who have never had to open up their own desktop computer, having to replace and fit a new power supply may see a bit daunting at first. In fact, the task is fairly simple. The main challenge is making sure you obtain the correct replacement power supply unit that fits your computer. With that part taken care of, the actual installation process involves basic tools and some patience. Once you've performed it a first time, a power supply replacement will be a simple task in the future. Fortunately, the need does not occur
Instructions
  1. Unplug your computer's power supply. Disconnect the monitor and external peripheral equipment (the keyboard, mouse, printer, modem, etc.). Remove your desktop processor unit (the main computer part) from its sitting place to table top where you work freely. Turn the unit around so the backside is facing you. Use a Phillips screwdriver to unscrew all the chassis bolts keeping the cover on the unit.
  2. Remove the cover and set it aside. Use the compressed air can to clean off the area you are going to work on. Locate the existing power supply unit by the cooling fan on the back of it. Use the screwdriver to remove the power supply's securing frame screws. Carefully pull the old unit free after disconnecting its wires to various computer units. Place the old unit aside or throw it away.
  3. Unpackage your new power supply unit. Remove all the packaging material and unwrap the wires connected to it. Carefully position the new unit in its holding frame in the processor unit. Use the screwdriver again to insert the securing screws holding the supply unit to the processor unit framework
  4. Separate the wiring coming out of the power supply unit. Find the motherboard wire and connect it first. Connect the drive power supply wires second as they match to your hard drives and your CD or DVD drive. Connect your floppy drive wire last if you have a floppy drive. Check that every wire is carefully but firmly connected. Rewrap the unused wires with a small zip-tie and tuck them out of the way.
  5. Reconnect your keyboard and monitor to the back of the processor. Plug the processor into a wall plug and turn it on to test the power supply. Confirm your computer starts up correctly and all the drives work properly. Turn the computer off and disconnect the power again. Replace the chassis cover and secure the chassis screws. Place your processor back in its resting place. Reconnect the power and all your peripherals.

Monday, January 31, 2011

Tech Updates: Microsoft Security updates


        Microsoft issued two security bulletins on 11 Jan, 2011 repairing two critical flaws that affect all versions of Windows. The software giant also updated a security advisory, issuing a temporary automated workaround that if deployed, would block attackers from exploiting an Internet Explorer zero-day vulnerability.

Wednesday, January 26, 2011

SOLID STATE DRIVE


SOLID STATE DRIVE


A solid-state drive (SSD) is a data storage device that uses the Solid-State Memory to store data. SSDs are different from the traditional Hard Disk Drives (HDD), which are basically electromechanical devices containing spinning disks which revolve over a spindle and movable read/write heads.

HOW TO GET UPDATES FOR ALL MICROSOFT PROGRAMS AND DRIVERS ALONG WITH WINDOWS UPDATES


Windows Update is a service provided by Microsoft that provides updates for the Microsoft Windows operating system and its installed components, including Internet Explorer.
Along with the version of Windows that you are using and the internet explorer, you can also receive updates for other Microsoft products installed on the computer through Windows updates.
For instance, if you are using Microsoft Office or Microsoft Money software, you can get updates for those software using Windows Updates.
Here’s how:
Open Windows Update from the “Start Search” option


In the Windows Update screen that appears, look for the option “Find Out More


Internet Explorer would open up with a title “Install updates, Office and More
Agree to the Terms and Conditions by making a check mark and then clicking on “Install


The next time, you use Windows Update; you would get the updates for all the Microsoft programs installed on the computer.

HOW TO REDUCE SYSTEM RESTORE SPACE TO GAIN MORE FREE SPACE ON DISK

HOW TO REDUCE SYSTEM RESTORE SPACE TO GAIN MORE FREE SPACE ON DISK

System Restore is a component of Microsoft's Windows Me and the later editions like Windows XP, Windows Vista and Windows 7 operating systems that allows rolling back of hardware drivers, system files, registry keys, installed programs, etc., to a previous state in the event of system crash or malfunction.

For instance, if the computer does not work normal after you installed a program, you can do a system restore to a date before the installation of that program. That would remove the program and also get your computer to a state when it was working fine. 

System Restore takes a snapshot of the system files, drivers and settings each time a restore point is created. When too many system restore points are created that occupies a considerably huge disk space.

You can remove the older restore points to free that disk space or just restrict the space used. To do that:
1.      Right Click on “My Computer
2.      Go to “Properties

3.      In the Window that appears, Click on “System Restore
You would see the drives on the computer as “C:\” , “D:\” etc.
4.      Highlight the drive where you would like to free up the disk space and then click on “Settings

5.      In that window, under the disk space usage, use the scroll bar to reduce the disk space allocated for “System Restore
6.      The default size is 12% of the disk space. You can increase or decrease it as needed
The computer has to be restarted for the changes to take effect.


Saturday, January 22, 2011

INTERNET EXPLORER AS A TAB IN FIREFOX

HOW TO OPEN INTERNET EXPLORER AS A TAB IN MOZILLA FIREFOX


Many users find it easy to browse the internet with Mozilla Firefox because it is faster and it is more customizable. But still there are some websites that work good only with Internet Explorer and not Firefox. And some Microsoft Websites open only in Internet Explorer like the Windows updates                                            

Have you ever wondered if there is a way to open Internet Explorer within Firefox?                                        

There is an Add-On available in the Firefox website that will help you open Internet Explorer within Mozilla Firefox as a tab. You can find the Add-On in the Mozilla website with the name IE Tab here                            

Just download and install this Add-On from the Mozilla Firefox Add-On website and whenever you right click on some icon you will get an option “View this Link in IE Tab”                                                                         


When you click on it, that particular page will open with Internet Explorer as a tab inside Firefox browser                 


This article applies to Windows XP, Windows Vista and Windows 7

Friday, January 21, 2011

RIP DVDs WITH VLC MEDIA PLAYER


HOW TO RIP DVDs WITH VLC MEDIA PLAYER


VLC Media Player Users would know that VLC is one of the best multimedia players for it can play almost any video type.

To add credits to VLC Player, there are other features that make it more likeable.

One such feature is the DVD Rip feature which works fine with Windows XP, Windows Vista and Windows 7

How To Create a DVD Rip:

Place the Video DVD that you want to rip in the DVDdrive

Open VLC Media Player. Click on Media


Click Convert/Save

In the “Open Media” window that is open, click on the Tab with the name “Disc”

Make sure that DVD is selected and choose the “Disc Device” which is your DVD drive and then click on “Convert/Save”


In the next window that opens up, under “Destination”, click on “Browse” and name the file with the desired list of extensions you see under file types and click on “Save”


In the next window, click on “Start”


Now the Video plays and the DVD Ripping happens simultaneously. Do not pause or stop the video until the entire video is complete.

Once the Video ends, close the VLC Media Player and check if the output file plays fine, which sure will!!

Wednesday, January 19, 2011

HOW TO CONFIGURE WINDOWS MEDIA CENTER TO OPEN A LIBRARY WHEN LAUNCHED

HOW TO CONFIGURE WINDOWS MEDIA CENTER 
TO OPEN MEDIA LIBRARY WHEN LAUNCHED


Windows Media Center is a digital video recorder and media player developed by Microsoft. It is an application that allows users to view and record live television, as well as organizes and plays music and videos. The application is included in various versions of Windows XP Media Center Edition, Windows Vista Home Premium and Ultimate and all editions of Windows 7 except for Starter and Home Basic editions.

When Windows Media Center opens up it opens with a default animation page and then the user must manually select the music, video or the live TV option etc.


There are ways that allow the user to open the Windows Media Center directly with a library

Here’s how to do that

Right click on the Windows Media Center icon on the desktop

Go to “Properties”


In the target you would find the value “ %windir%\ehome\ehshell.exe ”

Leave a space after %windir%\ehome\ehshell.exe ” and type in the value
/homepage:MusicBrowsePage.xml /PushStartPage:True and then click on "Apply"  and then "OK"

Note: This would open up Music Library by default when you open the Windows Media Center

If you would want to open Pictures Library by default, change the value to /homepage:PhotosBrowsePage.xml /PushStartPage:True

If you would want to open Videos Library by default, change the value to /homepage:VideosBrowsePage.xml /PushStartPage:True

"Labels" in Gmail


What makes Gmail's labels better than folders is that you can "put" any message in any number of folders. An email can belong to the "most urgent" messages as well as to a particular project at work, for example. It can carry the "needs follow-up" and "family" labels at the same time, and you will find it under both labels.


Gmail does not let you put messages in custom folders. What looks like a limitation is an advantage, however. Gmail has a flexible alternative to folders: labels. Each label operates like a folder. You can "open" the label and see all the messages "in" it. So far, so good.

Creating labels in Gmail


* Select Settings from the top Gmail navigation bar.
* Go to Labels.
* Type the desired name for the label under Create a new label:
* Click Create.

Saturday, December 11, 2010

Enable Keyboard Shortcuts to Refresh All Tabs/Pages in Opera browser

Enable Keyboard Shortcuts to Refresh All Tabs/Pages in Opera browser


In Opera browser, we've always wondered about how to reload all tabs opened up. This feature exists in Firefox and can be simply used by right-clicking and choosing refresh all from the drop down.

Well, it's simple. Though, not directly configured but we can easily enable this through keyboard shortcuts.

 "F5" is the default shortcut to "Reload". We'll change this to "Reload all pages" to reload all the tabs by pressing "F5" on the keyboard.

Here's how:


Wednesday, December 1, 2010

Tuesday, November 23, 2010

Dangerous Celebrities in Cyberspace!!

Dangerous Celebrities in Cyberspace!!


The second quarter of 2010 has been found to report more malwares than ever earlier.


This year, the search results for celebrities are safer than they've been in previous years, but there are still dangers when searching online. "Through consumer education and tools, consumers are getting smarter about searching online, yet cybercriminals are getting sneakier in their techniques. Now they're hiding malicious content in 'tiny' places like shortened URLs that can spread virally in social networking sites and Twitter, instead of on websites and downloads.

Cameron Diaz has been named the most dangerous celebrity on the web for 2010 by a top security firm. Last year, Jessica Biel had topped the list.

Research by the security firm, which has been acquired by Intel, revealed that web users searching for images, screen savers and videos of the 'Knight and Day' actress have a one in ten chance of being presented with results that lead to malicious web pages.

According to the research, cybercriminals often use the names of popular celebrities to trick web users into visiting sites infected with malicious software. Those navigating to the site could find the malware installed on their computers.

Pretty Woman star Julia Roberts was named the second most dangerous celebrity on the web, while Justin Timberlake's current girlfriend, Jessica Biel, took third place.

Also said that while movie stars and models top the 'most dangerous' list this year politicians including US President Barack Obama and Sarah Palin are among the safest celebrities to search for on the net.

The top 10 celebrities from this year’s study with the highest percentages of risk are:

1. Cameron Diaz – Searching for Diaz results in a one in ten chance of landing on a risky site. She has most recently been in the spotlight with blockbuster movies, "Knight and Day" and "Shrek Forever After." When "Cameron Diaz and screensavers" was searched, 19% of the sites were identified as containing malicious downloads.


2. Julia Roberts – Academy Award-winning actress Julia Roberts is one of America's sweethearts, and will soon be in the spotlight with her upcoming release of "Eat, Pray, Love." The overall risk of searching for Roberts is nine percent, yet searching for "Julia Roberts and downloads" results in a 20% chance of downloading a photo, wallpaper or other file laden with malware.


3. Jessica Biel – Last year's Most Dangerous Celebrity fell two spots with searches resulting in fewer risky sites this year. Biel continues to be in the spotlight with her on-again, off-again relationship with Justin Timberlake, and appeared in "The A-Team" in June 2010. While her overall search risk is 9%, searching for "Jessica Biel and screensavers" results in a 17% chance of landing on a risky site.


4. Gisele Bündchen – The world's highest-paid supermodel moved up two spots since last year. Searching for "Gisele Bündchen and screensavers" can prove risky, 15% of the search results for this beauty can put spyware, malware or viruses on your computer.


5. Brad Pitt – Pitt is often in the spotlight with news of his movies and his personal life. It's no wonder why this leading man has been in the top ten for the past three years. He moved up in rank five spots this year. Downloading photos, screensavers, or other files of Brad can potentially put adware or spyware in your computer. Historically, he's been one of the most dangerous celebrities to appear in search results.


6. Adriana Lima – Searching for downloads of this Brazilian beauty can direct users to red-ranked sites. Lima is best known for being a Victoria's Secret Angel since 2000.


7. Jennifer Love Hewitt, Nicole Kidman – Searching for these Hollywood starlets resulted in an equal number of risky download websites.


8. Tom Cruise – With recent buzz around his MTV Awards performance as well as his movie, "Knight and Day," Cruise rises to the top ten.


9. Heidi Klum, Penelope Cruz – Both of these ladies are consistently in the spotlight, and share the #9 spot. Cybercriminals use their names to lure people to risky sites. Klum hosts "Project Runway" and Cruz has been in the spotlight recently for her role in the "Sex and the City 2" movie and is expected to be in the fourth film of the "Pirates of the Caribbean" series.


10. Anna Paquin – This "True Blood" star is as dangerous on the web as she is on the screen. Searching for screensavers of Paquin can lead you to downloads filled with malware.


Cybercriminals follow the same hot topics as consumers, and create traps based on the latest trends. Whether you’re surfing the Web from your computer or your phone or clicking on links in Twitter about your favorite celeb, you should surf safely, and make sure you’re using the latest security software.

Monday, November 1, 2010

Where's the Quick Launch bar in Windows 7?

Where's the Quick Launch bar in Windows 7?


Windows 7's new taskbar functions as a program launcher as well as task switcher. As a result, the old Windows XP style Quick Launch bar, the area on the left side of the taskbar that contained shortcuts for frequently used programs, has been banished. However, if you really miss the little applet, you can add it back. 


Here's how to do it:

1. Right-click the taskbar and choose Toolbars --> New Toolbar.


2 . You'll be asked to select a folder for where the new toolbar should live. In the Folder text box at the bottom of the dialog box, enter this text:
%userprofile%\AppData\Roaming\Microsoft\Internet Explorer\Quick Launch

3. After you do that, click Select Folder. A link for the Quick Launch bar will be added to the taskbar. It will be on the right of the taskbar, just to the left of the Notification area.

4. It's not particularly useful docked all the way to the right with no application icons showing, so we're going to have to do a bit of work on it to make it useful. Right-click the taskbar and, in the pop-up menu, remove the check next to "Lock the taskbar." Now right-click Quick Launch and remove the checks next to Show Text and Show Title.


5. Once you've done that, drag the vertical triple dotted line next to the Quick Launch bar to the left until you expose its icons. To prevent further changes, right-click the taskbar and check Lock the taskbar. You can now use the Quick Launch bar as you could in Windows XP and Vista, including adding icons to it and deleting them. You can also check the simple way to add Quick Launch in Windows XP.

LinkWithin

Related Posts Plugin for WordPress, Blogger...